Saturday, March 22, 2008

Another Big Pour, DONE!

Laying the steel took longer than I thought.  Now that the forms were mostly finished,  we spent days hauling up rebar,  piece by piece, to the top of the forms.  By Friday, March 14 I was finally ready for my structural inspection. That went well,  and I spent some of Saturday and all of Monday working on the forming details.  On Monday afternoon I called for the city inspector to come by on Tuesday.  We spent all of Tuesday detailing the forms.  I had already set up the concrete and pumper for Wednesday,  so I worked until VERY late Tuesday getting ready!  At midnight I went home,  not because I was ready,  but I wanted to have a little sleep before the big day!

The  Big Pour Day!

 Since I still was not completely ready for concrete,  I decided to start at 6:00 am and do what I could without making noise.  When I got there the finishers were already waiting! At 6:30, the pumper arrived and started setting up. From then on it was non-stop action!  I didn't even have time to break out the camera until almost noon!

The first truck arrived at 7:00 and we started pumping into the walls of the cellar. The 2nd through 4th trucks came about 40 minutes apart,  and we all worked really hard to keep the concrete pumping.  I put a hold on the next truck until after lunch so we could catch up!  I was STILL fixing parts of the form!

After lunch we finished the concrete pumping,  and started finishing.  


The finishers started with the floor above the cellar,  then moved up to the round tower. Finally, they tried to finish the master bedroom,  but it was too wet to finish so we waited.
By now it was past 6:00pm.  I went out and bought some dinner for the guys while they monitored the concrete.  As soon as it was set enough,  they started finishing. By this time it was dark and I had some flood lights set up.  By 9:00pm, they were done! 

Here are some scenes from this crazy day!


The next day I was able to see the finished slabs in the daylight!  They turned out very nicely!
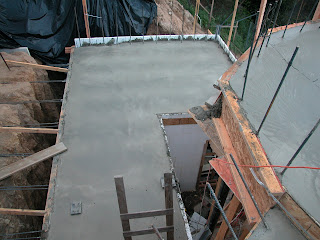


The day after the Pour,  we spent most of our time moving all of the ICFs that were stored on the top level of the excavation.

We stacked as many full bags as we could over the cellar.  
 
The rest of the pieces were taken out of their bags and neatly stacked up on the Master Suite floor.

  Once again,  the light weight of the ICFs made this easy and fun!  One of the guys stood at the bottom and tossed each piece up to me about 20' away.  They just floated up!   In fact, sometimes a gust of wind would catch them and they would go right past me!

By the end of Thursday we had the upper footing area cleared out and ready to start cutting.


Many months ago,  Mike the excavator had done a pretty accurate job of cutting the trench for this footing. All we will have to do is level it a bit more,  and cut the key.  That will be next week's focus!


Now that the cellar and livingroom walls are filled,  we will also set the gravel and french drains for backfilling.


Next,  we backfill the walls and prepare to pour the rest of the kitchen slab!

Sunday, March 9, 2008

Another 3 levels, almost ready!

Another long gap between posts!   Sorry! 

I have been busy on Buckingham, helped out by a long period of great warm weather!


After finishing the Livingroom and Cellar walls and the Master Bedroom floor, I decided it would be best to do the Master Bedroom Tower floor at the same time as the rest of the suite.


This involved building a complex form, supported on 12' tall posts. This form also included my first curved ICF wall section. I learned a few tricks, and will be able to build the rest of my curved walls much more efficiently! The door shown in the picture below is actually the coat closet that will be in the 3' thick wall of the tower.


This view is from inside the foyer looking through the forest of shoring to the main entry door on the right, with the coat closet to the left.


The forming of the beams surrounding the tower floor was difficult.  Even though they were less than 7 feet long, the fact that they were 13 feet in the air made them pretty hard to construct.  I frequently found myself at the top of a ladder leaning on a post and raising  sections of the form by myself!  

This view of the Master Bedroom level is taken from the round tower looking down to the Master Sittingroom and bathroom area.


The floor above the cellar is the front portion of the Kitchen/Greatroom.  The rest of the Kitchen floor will be poured when I have moved the ICFs being stored on the hill!

One portion of the cellar ceiling supports a structural post that carries a load all the way to the roof.  Since the post does not line up with a wall (my crazy design!),  a triangular section of the ceiling is a solid beam to support the post.


Since the slab will be poured in 2 phases,  I have set rebar into the top of each joist that will tie the 2 slabs together.


This panoramic view from the master bedroom level shows how close we are getting to the level of the back yard!  Just a few steps up from this level will be the kids bedroom level,  then a few more steps up to the back door that leads to the yard and roof deck. 


Just a few more days of forming and prepping,  and there will be another big pour day!


Monday, February 11, 2008

Structural Posts and the Cellar

On Monday the first of three orders of Structural Steel Posts arrived!  I found a fabricator in Burbank that not only did great work,  but did it very fast!  They even delivered!

The workers and I heaved the posts from the street level to the top of the garage,  then up to the foyer.  They were NOT light!  Each posts is made from 1/4" thick 4.5" diameter steel pipe with 1/2" thick steel plate on each end.  

It took all 3 of us to carefully stand them up into place and set them down on the anchor bolts.  As each post was placed,  I adjusted the nuts on the top and bottom of the plate at each bolt to make sure the posts were perfectly plumb.


By the next day all of the posts were in place.  We next shifted our focus to the cellar.  I finished setting the front wall and worked my way up to the full height.  Then, we started building the shoring so I could set some of the great-room floor above. 
 
I am still juggling storage space! Since the garage was filled up with the AmDeck,  I was unable to get to some of the shoring lumber that was supporting the living-room floor pour to re-use it,  so we moved up just enough AmDeck to build the great-room floor AND open up access to the lumber in the garage!  Now I could finish the shoring and the floor on top!  


It was very satisfying to get the cellar wall in place!  Not only will it be my home office, but it helps define where the front of the house will be.


I am not the only construction project in the area making noise and blocking traffic!  The Glendale Water and Power department has started an expected 2 year project,  replacing a huge reservoir that was under a part of the Chevy Chase Golf Course.  

The scale of this project is incredible!  It took weeks just to scrape off the grass and soil that covered the concrete reservoir,  creating a huge mountain!  Now they are demoing the roof and trucking it away. From 7:00am to 3:30pm there is a constant deep hammering sound as they break the roof into manageable bits.  

It will be interesting to follow the progress!  


Saturday, February 2, 2008

Living-room Walls, continued...

By the end of last week,  I did indeed have the living-room walls up,  and most of the major shoring in place.  The rains had no effect on the construction,  other than getting everything WET!  I did have a few areas to sump pump out,  but other than that,  once the rains stopped, I started working.   

A lot of bracing was added to the shoring,  in anticipation of the arrival of the steel joists.  We also spent time organizing our stored materials so that the cellar walls could be started.  As I continue to create spaces and use materials,  this will get easier,  but right now we still end up moving materials back and forth to keep them out of the way of what ever we are doing!

On Thursday I met with the fabricators of the structural steel posts that will be part of the support system for the floors above.  I also had a good meeting with the folks at Precise Air,  the company that will be doing our Heating and air conditioning systems.  We hammered out some important details,  then I headed back to the lot.  That afternoon,  the steel joists were delivered, and by the end of that day we had placed all of the longest joists up on the shoring.

By Friday morning we had all of the joists in place and started setting the AmDeck.  The Amdeck has worked wonderfully.  It is actually fun to place an entire floor in a few hours! I simply sit up on the shoring and one of my helpers tosses up each piece from the ground.  I set it in place, and catch the next one.  It's that easy!  

By the end of the day I was able to stand on the floor of our future Master Bedroom and look out at the sunset!  
Next week we will finish the forming and set the steel posts in place.  Then we will get the cellar walls going.  There is a fair amount of rebar to do also.  Luckily,  the weather looks good for a full week of progress!

Wednesday, January 23, 2008

Living-room Walls

Now that I have a nice level slab, laying out the walls was pretty easy. First, I drew chalk lines where the walls should be, then screwed steel channel down to the slab. The ICFs fit into the channel, keeping the wall straight and preventing the ICFs from moving around. After the first course of blocks were set, the rest went up pretty easily. After each course of ICF, rebar is laid in the webs then the next course is installed, and so on.

As the walls were going up,  I started building the shoring that would brace the walls and support the next floor above.  
By the end of the 4th day,  the walls were 8 feet high,  and the openings for the french doors,  small window, and the fireplace were created.  I'm having to wait for another rain storm to pass, so I'm taking the opportunity to order the steel posts and joists for the upper floors. Hopefully, the walls will be done by the end of the week,  weather permitting!

On Tuesday the majority of the AmDeck forms were delivered.  It took 3 trucks to bring them here,  and they completely filled the garages!  There are still almost 200 blocks to bring,  but I asked the company to hold them for a bit so I could make some room!

Thursday, January 17, 2008

4 Floors, Done!

Finally,  after weeks of planning,  The day of the Big Pour arrived!  Both inspections went well the week before,  and I worked most of the weekend doing the final details on the forms.  

Because I decided to do all 4 of these levels at the same time,  the form work was very complex.  Not only were there the transitions between levels,  there were curved sections and custom beams that support various parts of the floor.  

Even with all the time I put in,  there were still things to do as the trucks started rolling up and the concrete started pumping!   

The footings in the back of the living room took almost 2 full trucks of concrete alone!   

After the living room footing was filled,  the cellar footing and slab was done.  

Next,  the walls supporting the foyer and the foyer slab were poured.

Finally, the walls supporting the living room and the living room slab were poured.


In total,  72 cubic yards in 8 trucks were poured.  The 4 finishers stayed all day,  and did a really nice job!

Here's a little video of the action!


Next,  the living room walls start going up!


Sunday, January 6, 2008

Almost ready for a Big Pour!

We had a great wind storm, much stronger than I thought! It actually blew the plastic that I had draped over the cut slopes all the way up and over the top fence!


In the weeks between Thanksgiving and Christmas we finished the Amdeck floor forms for the living-room and foyer, and started lay in the steel reinforcement.  And there is a LOT of it!

At the front of the livingroom,  there is a very strong reinforced beam. This beam spans the width of the garage below,  and supports the 2 story high front wall of the house.  Also visible is the AmDeck floor forms and the steel joists that support it.

Just before the Christmas Break,  the majority of the forming was done, and most of the steel was placed.  I was finally able to make a list of things to do on one page!   

This view shows the Living-room floor which is partially on grade and partially suspended on the AmDeck.  The round foyer is also visible in the center of the picture.

From the top of the cut,  the entire building site is visible, as well as my stockpile of ICFs waiting to be used!


After Christmas Break,  it was back to the forming details!  A full week of working on the items on my to-do list,  and it wasn't getting much shorter!  Many of the items were for complex forming connections that needed to be figured out,  and that took a lot of time.   Just before the New Years holiday,  I had the Structural Observation inspection of the steel reinforcement. There was a lot to look at,  and I passed!  That was a nice way to end 2007!    

It was a short week to start 2008.  The first 2 days were spent whittling down my to-do list,  it is getting shorter!

At the end on this week we were threatened with a triple rain storm,  the worst since 2005.  

I fixed the plastic I had hung earlier,  and added another 200 square feet,  mostly covering the lower cuts and some of the forms.

It's a bit surreal now with my white foam house rising up from a black plastic hole in the ground!
The storm hit as expected,  but not quite as strong as they were warning.  It started raining Friday and has rained every night this weekend,  but as of Sunday afternoon,  everything looks OK.  I went up and sump pumped the trenches during a break in the rain,  and other than some of the plastic tearing where water had gathered into puddles,  and a lot of mud backing up behind my sandbag dams,  I think we will come through the storm pretty well.  Now I just need to dry it out,  and do the final touches and get my city inspection so I can POUR!