Wednesday, September 26, 2007

The 2nd Pour!

Yesterday was the second concrete pour for our house, and a number of milestones were passed! The main thing was that this was my first ICF pour! All in all it went very well! We had a number of "challenges", but they were all worked out! The day was very hectic, so my photo coverage is not very good!

Here is how the day went:
The trucks were scheduled to arrive starting at 7:00am, so I got there while it was still dark, around 5:30. I had a few last minutes things to prepare, including building a little cradle to support the very heavy concrete pumper's hose as it goes up to the roof deck (see below), and a few other small thngs I just wanted to do. My laborer was scheduled for 6:30, so I had a good hour to fiddle around. Soon it was 6:30, then 6:45. Not only was my laborer not here, but the pumper had not shown up, and he has a lot of set-up that has to take place before the first concrete truck arrives! About 5 minutes to 7:00, both my laborer and the pumper rolled up! Luckily, the truck was also late! We were completely ready by the time it came! Also arriving was my deputy inspector. This is a private inspector I am required to hire whenever I pour high-strength concrete. On this house, that will be anything in a wall or on the AmDeck slabs. He supervises the pour, making sure the concrete is poured as designed by the structural engineer. He also takes concrete samples that are tested for strength at 7 days and at 28 days from the pour. More about that later.

The first truckload was used to fill the bottom 4' of the wall. After completely going around the walls, we were ready for the second truck. About 30 minutes later, it showed up. We went around the walls again, this time filling up the next 4', so the walls were almost all filled. The next truck was supposed to get there soon after, but about 45 minutes later, still no truck!
I called dispatch only to find out that the 3rd truck had been stuck in traffic for 2 hours! It was getting so late that I had to order a replacement truck, since the concrete would have been unworkable by the time it finally got here. The company totally understood and ordered a replacement truck. While we waited for the replacement, the 4th partial truck arrived. This is called the "cleanup" load, and is an addition to the original order. It seemed like the original 3 trucks was not going to be enough, so I had ordered an addiitonal 4 cubic yards.


We started pouring the very top of the walls and the roof deck system. This went very smoothly too, and faster than I expected. When the replacement for the 3rd truck arrived, we finished the deck. We didn't end up using the whole truck, when the deck was finished there was about 4 yards left! Oh well, I guess I should have trusted my original figures!

There were a few places where I got slight bulges in the forms, but no "blowouts" which was my main concern, as this was my first ICF pour. One of the bulges is visible here at the back corner. This will not be a problem, since it wil all be underground, but I now know to spend a little more time reinforcing at the corners!


Since the garage roof will be waterproofed and buried under the earth, I didn't have the finishers spend too much time doing a perfect job, but, once again, they were a great crew to have around, finishing the slab just right, and helping out on all aspects of the pour.

By the end of the day, we had poured all of the walls and the entire garage roof! A very successful first ICF Pour!

Friday, September 21, 2007

Ready for the Pour!

Last week showed a lot of progress and it felt like it went quickly, but we were far from ready for concrete. This week proved just how much was still needed! Dad and I worked 4 full days with a laborer's help part time, and just got the forms to the point that they could be inspected on Thursday.


Inside the walls there was a lot of fine tuning required. Additional supports and braces were added to the shoring and the AmDeck blocks were tied down so they wouldn't move. The joints between Amdeck blocks were sealed wih spray foam, and an additional 1" layer of foam was added to the top, to create a deeper concrete joist.


On the outside and at all openings, OSB was added to reenforce any potential weak spots as well as to hold "bucking" and anchor bolts in place.


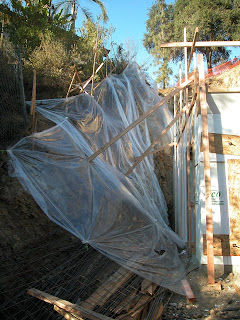
The weather was forecast to be rain on Thursday and Friday, so we took the time to protect the hillside by covering it with plastic sheeting. Of course, the predicted rain did not materialize until the time of this writing (late Friday night), and so far it has been pretty minor!


Next, the rebar was added to the roof deck joists, and the steel mesh that reenforces the slab was laid in place. This was more difficult than it sounds, because it comes in 7'x 20' long sheets, and takes 3 men to manuever. All of this steel was tied in place and held off of the foam forms with little concrete spacers called "dobies". The top edges of the walls were reenforced with 2"x4"s where needed, and a safety railing was added. Finally, the forms were complete!

The Structural Observation inspection went well on Thursday, as did the City Inspection today.

I am approved for the next pour!

Saturday, September 15, 2007

All Hands on AmDeck!

A lot of progress this week! On Monday the AmDeck arrived! This is the forming system used for all horizontal planes (floors and roofs). I was concerned about storage space so I asked the supplier to only bring a small portion of my order. I'm glad I did, because the single truck load filled up the street, and once I brought it into the property, filled up any free space I had!


The beginning of the week was spent finishing the walls. Dad was able to help out for a few more days this week, and we got a lot done together. It is really enjoyable working with him! As the walls went up, rebar was inserted to add strength to the concrete. Here is a view of the massive amount of steel needed at the sides of the garage door openings.


Soon all of the garage walls were completed and I got the fun task of cutting the archways over the garage door openings! Finally, something more interesting than a square corner!


As I was finishing the ICFs, Dad was working on the custom forming. Any time that there is an opening or a special beam that is not the standard ICF width, forms need to be constructed out of wood. Dad framed the center structural beam form and closed many of the edges of openings.

Next I was ready to start setting the garage roof forms.


The AmDeck forms are a modular system, each piece is 24" by 32" and simply sets on to steel joists resting on the temporary shoring.


The pieces are very light and easy to handle, and the roof went up very fast!


On Saturday, Jeanne came and worked the day with me! Here she is assembling the steel reinforcement for the structural beam between the garage bays. It was great to work together on our own home!

Saturday, September 8, 2007

Shoring!

After one more half day and one full day in the sun, we got all of the garage side and back walls up and built the shoring in one of the garage bays! I am very pleased with the progress of the last 2 days, I think we have a good feel for the ICF building process!


Next week the shoring will be completed, and the complex front garage wall with the garage door archways will be formed!

Friday, September 7, 2007

Walls: Day 2

After the first course, it just gets easier! On the second day we got almost 3 courses up, Each course consisting of a layer of ICFs and a continuous horizontal rebar.


On the third day we finished the third and fourth course, and I placed orders for shoring lumber and more steel. Tomorrow I will start building the shoring system. The shoring has the dual purpose of keeping the walls aligned and supporting the garage roof while the concrete is poured and until it attains full design strength.

Wednesday, September 5, 2007

WALLS!

Dad and I spent a good day getting ready to start building the walls! First, we measured out the exact placement of the garage walls, then screwed steel channel into the slab. These are used to align the walls and keep them straight, as well as secure the bottom of the walls during the pour.


After the channel was set, we started assembling the ICF blocks, starting from the back corner. As the blocks were laid, the horizontal reinforcing steel (rebar) was inserted.


By the end of the day, we had set all of the channel, and laid most of the first layer of ICFs. Tomorrow, the walls start going up!

Tuesday, September 4, 2007

Hot Work

With the garage slab finally poured, I had a few more days of prep before we could start building the walls. First, I needed to cut a ledge in the cliff for a footing that would support the middle of the living-room floor and create a back wall for the utility area.


This was difficult work, requiring me to sometimes stand on the narrow ledge I was cutting, secured by a harness, holding on to a rope with one hand and operating the jackhammer with the other! It was also a very hot week, so the work days had to be shortened so we would not overexert ourselves.


As I cut the ledge, the workers cleared the fallen rock at the other side, then we would switch sides and I would create more of a mess for them! For two days I jackhammered and they shoveled and wheelbarrowed the dirt and rock to the front of the lot. After the pile was almost as high as the gate, I once again had to rent a bobcat and dump truck and hauled dirt out for the next 2 days!

By the end of the week, I was finally ready to start building walls!